Mathematica 12.0 е програмен пакет разработен от фирмата Wolfram Research, с област на приложение в естествените и инженерни науки.
Използване на Mathematica в интерактивен режим
Стартиране на Mathematica в интерактивен режим под Unix/Linux
За да стартирате интерактивна сесия на Mathematica под Unix/Linux е необходимо да извършите следните стъпки:
1. Установете терминална сесия чрез SSH като използвате следната команда:
ssh -L7110:localhost:7100 username@physon.phys.uni-sofia.bg -X
(горната команда установява ssh сесия и изгражда тунел, в който пренасочва връзките към TCP порт 7110 на вашата машина към сървъра на шрифтове на physon, което е необходимо за правилната работа на Mathematica)
2. Добавете сървъра с шрифтовете към вашeто обкръжение на средата с командата:
xset +fp tcp/localhost:7110
(командата се изпълнява в сесията ви на physon, а не на вашия компютър)
3. Стартирайте интерактивна сесия с командата:
qsh -l h_rt=hh:mm:ss
където hh:mm:ss заместите с очакваната от вас продължителност на интерактивната сесия, напр. 8:00:00 (8 часа), като максималното ограничение е 12 часа.
4. Успешното изпълнение на горната команда ще предизвика отварянето на терминален прозорец xterm, в който можете да заредите необходимият модул за пакета Mathematica и да стартирате самото приложение:
module load mathematica/12
Mathematica
5. МНОГО ВАЖНО: Премахнете сървъра за шрифтове от настройките на X сървъра преди да прекратите ssh сесията до physon:
xset -fp tcp/localhost:7110
(командата отново се изпълнява в сесията на physon, а не на вашия компютър)
Пропускът да изпълните тази команда ще доведе до много вероятно “увисване” на графичната ви среда.
Визуализацията на динамични изображения е съпроводена с огромен мрежов трафик. Подсигурете си бърза връзка до клъстера, ако възнамерявате да използвате сериозно продукта.
Стартиране на Mathematica в интерактивен режим под Windows
Ако използвате Windows като операционна система е необходимо да инсталирате предварително X сървър за да бъдете в състояние да стартирате графични приложения на physon. Съществуват множество реализации на графични X сървъри под Windows, една такава добра безплатна версия е Xming.
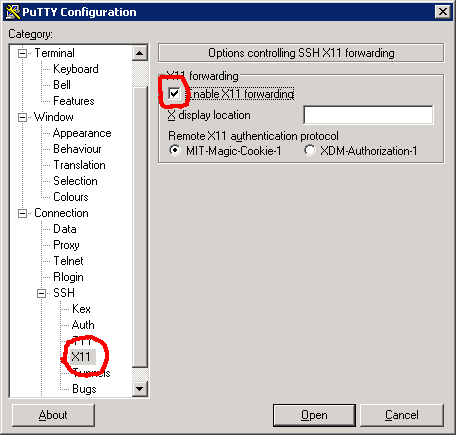
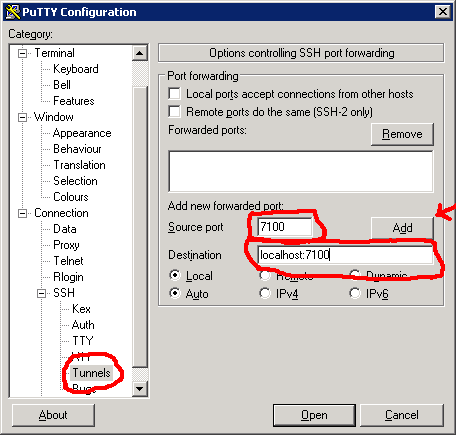
Следващата стъпка е да установите SSH сесия, разрешавайки пренасочването на X11 протокола, както и пренасочването на порт 7100. По-долу е показан примерна конфигурация на SSH клиента PuTTY.
Разрешаване на X11 пренасочване
Настройка на тунел за пренасочване на порт 7100
След установяване на SSH сесия към челния възел на physon е необходимо да се извършат същите действия, подобно на интерактивната сесия под Linux, т.е.:
xset +fp tcp/localhost:7100
Стартирайте интерактивна сесия с командата:
qsh -l h_rt=hh:mm:ss
където hh:mm:ss заместите с очакваната от вас продължителност на интерактивната сесия, напр. 8:00:00 (8 часа), като максималното ограничение е 12 часа.
Успешното изпълнение на горната команда ще предизвика отварянето на команден прозорец xterm, в който можете да заредите необходимият модул за пакета Mathematica и да стартирате самото приложение:
module load mathematica/12
Mathematica
Изпълнение Mathematica задачи през системата за пакетнa обработка на задачите.
Когато използването на графичен интерфейс не е задължителен (например продължителни продуктивни пресмятания), обичайна практика е необходимите командни извиквания да бъдат записани предварително в текстови файл с разширение .am или .m, например integrate.m:
Integrate[Sqrt[x]*Sqrt[a+x],x]
след което трябва да се подготви и подходящ скрипт за системата за пакетна обработка, който да извиква ядрото на Mathematica и да пренасочи входа му от .m файла:
# Файл math.job
#$ -N Mathematica Job
#$ -l h_rt=8:0:0
#$ -cwd
module load mathematica/12
MathKernel < integrate.m > integrate.out
Повече подробности за използване на системата за пакетна обработка можете да намерите тук.
Въведение в Grid Mathematica
Пакетът Grid Mathematica позволява използването на повече от един процесор при пресмятанията. Засега изпълнението на паралелни приложения е ограничено до 8 ядра (един възел). Подробна информация за изпозлването на Grid Mathematica можете да намерете тук.
Description
The modules software package makes it easy and reversible to set up a user environment to work with a particular software product. The packet is a mechanism for loading and unloading modules – reversible changes to the environment, allowing to work with specific software and/or a library.
Using the modules package the user does need to enter commands such as:
export PATH=/opt/intel/cce/10.0.023/bin:$PATH
export LD_LIBRARY_PATH=/opt/intel/cce/10.0.023/lib:$LD_LIBRARY_PATH
insted
module load icc/10.0
Usage
За да бъде използван modules, той трябва да бъде зареден чрез извикване на специален файл за начално зареждане. Това става автоматично при вход на потребителя в системата. Файлът настройва потребителското обкръжение за работа с modules и зарежда модула modules. След успешното инициализиране на пакета потребителят разполага с нова команда на обкръжението, с която може да зарежда и отзарежда различни модули, както и да вижда списък на наличните или заредени модули. Командата е:
To use modules, it must be loaded by calling a special boot file. This happens automatically when the user enters the system. The file sets the user environment to work with modules and loads the module modules. After successfully initializing the package, the user has a new environment command that can load and reload various modules, as well as a list of available or loaded modules. The command is:
module <parameters> <subcommand>
Running this command without assigning a subcommand will result in a list of available subcommands. The most useful are:
list – shows a list of currently loaded modulesadd or load – loads a list of modules and applies their changes to the user environmentrm or unload – unloads a list of modules and returns changes to the user environmentavail – displays a list of available moduleshelp – displays help information (if available) for each of the modules in the submitted list
Всеки модул е снабден с номер на версия, разделена от името му с наклонена черта – modname/version. Някои модули имат повече от една версия, което отговаря на различни версии на софтуерния пакет, предоставян от модула. Пример за такъв модул към момента на писане на този текст е Intel Fortran Compiler, достъпен в две версии – 10.0.023 като модул ifort/10.0 и 9.1.043 като модул ifort/9.1. Една от версиите е следвана от маркер (default), което означава, че това е версията на модула, която се зарежда по подразбиране, ако на командата add (load) се укаже само име на пакета без версията.
Списък на модулите
Следва неактуален списък на наличните модули и кратка информация за всеки от тях. За да получите актуален списък, използвайте командата:
module avail
Компилатори
icc/10.0 – Intel C/C++ Compiler (icc и icpc) v10.0.023. Този модул следва да се зареди, ако искате да използвате C/C++ компилатора на Intel, както и да стартирате динамично свързани приложения, компилирани с този инструмент. Модулът следва да се зарежда в пакетните задачи за Sun N1 Grid Engine, ако в тях се извикват приложения, компилирани с тази версия на ICC.ifort/10.0 – Intel Fortran Compiler (ifort) v10.0.023. Вижте обяснението за icc/10.0.ifort/9.1 – Intel Fortran Compiler (ifort) v9.1.043. Вижте обяснението за ifort/10.0.sunstudio/12 – Sun Studio 12. Този модул дава достъп до 12-та версия на компилаторите и интегрираната среда за разработка на приложения на Sun Microsystems Inc.
Паралелни среди
ompi_gnu/3.4 – OpenMPI с компилатори GNU v3.4.6. Този модул е предназначен за компилиране и изпълнение на паралелни MPI приложения. Компилацията се осъществява с компилаторите на GNU, които поддържат C, C++ и FORTRAN 77. За успешното стартиране на MPI задачи е небходимо следната команда да се намира преди извикването на mpirun в скрипта на задачата:
module load ompi_gnu
ompi_intel/10.0 – OpenMPI с компилатори Intel v10.0.023. За разлика от GNU версията, този модул поддържа по-новите диалекти на Fortran – 90 и 95, както и по-добра оптимизация на генерирания машинен код за процесорите на клъстера. Модулът зарежда и отзарежда автоматично следните модули: icc/10.0 и ifort/10.0. Вижте обяснението за ompi_gnu за повече информация.
Програми за настройка
idb/10.0 – Intel Debugger (idb) v10.0.023idb/9.1 – Intel Debugger (idb) v9.1.043
Пакетена обработка
sge/6.2 – Sun Grid Engine 6.2. Зарежда се автоматично при включване на потребител в системата.
Unix graphical applications use a network client / server technology known as the X Window System, X11 (the version of the network protocol used) or just X. Unlike many other client / server schemas, X roles are exchanged – the server is on the user machine, while the graphical application may be located anywhere in the world, accessible through the TCP / IP network. To indicate the graphical server where programs should display their output, the environment variable $ DISPLAY is used. Its value is as follows:
address.of.X11.server:display.screen
where:
address.of.X11.server — IP address or DNS of the X11 server. This is the address of your machine, except when tunneling X11 through SSH (see below);display — serial number of the display on which the X11 server is running. Most often 0, but there may be another value. It is directly connected to the TCP port number where the X11 server accepts network connections from clients: TCP port = 6000 + display;screen — sequential screen number within one X11 display. Most often 0, but for multi-screen systems (e.g., using Xinerama) there may be several different screens. Using the default value of 0, the whole .screen can be omitted and the value of $DISPLAY acquires the more compact look address.of.X11.server:display.
For client authentication, the X11 provides several different options that depend on the specific conversion. Specifying the authentication mechanism and the necessary data is done in the .xauth file located in your home directory on the machine where the graphical applications are running.
Communication between applications and the X11 server can be done either directly or through an encrypted tunnel using SSH.
Direct connection
Using direct connection, you indicate (manually or automatically in the .bashrc) the address of your X11 server in the variable $DISPLAY. This method has a number of drawbacks:
- works only if your machine has a public IP address or is located in the merged network of the Atomic Physics department and the Theoretical Physics department of the Faculty of Physics. It does not work if you are behind NAT (Network Address Translation), i.e. if your computer has an IP address of the types 10.x.x.x, 192.168.x.x (exceptions make addresses 192.168.2.x in the AP network and the TP of the Faculty of Physics), 172.16.x.x to 172.31.x.x;
- you need to make the X11 server visible from the outside if you are using a firewall;
- you must use a simple access control mechanism to the X11 server based on the Cluster IP address only. Any other user of the system can connect a graphical application to your server, which represents a certain security risk;
- anyone who has access to the network transport facilities between the cluster and your computer can “eavesdrop” your keyboard input.
If you still choose to use this method, then the commands are:
DISPLAY=server.address:dpy.scr
export DISPLAY
setenv DISPLAY server.address:dpy.scr
You should replace server.address, dpy and scr with their respective values.
SSH tunnel
The SSH protocol works by setting up one or more secure data transfer channels, one of witch channels transfers your interactive session. SSH mechanisms are provided that can be used to redirect random TCP links, both on your machine and on the SSH server side. However, when redirecting X11, a number of server-side automations happen:
- a file with authentication data is generated in your home directory (
~/.xauth);
- the environment variable
$DISPLAY is established.
You can check whether X11 tunneling is successful with the command
echo $DISPLAY
If you get something like localhost: 10.0, redirection is found correctly. If you get an empty line (for sh-like shells) or an undefined variable (for csh-like shells), then tunneling has not worked for some reason.
The tunneling method through SSH works even if your machine is behind NAT or a firewall.
X servers
There is plenty of commercial and free servers running the X11 protocol. Here is a list of the most famous ones:
XFree86
One of the oldest free open source X11 protocol conversions. There are versions for almost all existing operating systems, including Unix and Unix-like Linux, Windows, and even OS/2. If you are using an old version of Linux, your graphic subsystem is probably XFree86.
X.org
A modern XFree86 clone, derived from a conflict of interest regarding the licensing of XFree86. Fully free software under X11 (MIT) license. Most modern Unix-like operating systems and Linux include X.org.
Mac OS X
Apple’s operating system includes an X11 server based on XFree86 4.4 (in Tiger) or X.org (in Leopard). For Tiger, the packet should be selected during installation or put on afterwards. Mac OS X itself uses a different graphics subsystem.
Xming
Xming is a minimalistic but fully functional X11 for Windows. Unlike its full-fledged partners, Xming only includes a graphical server, a font package, and integration tools with the free SSH client PuTTY. It is based on the source code of X.org and as such supports all its extensions that can work on the Windows platform. The package is free and you can download its latest version from Sourceforge.
Xming only works on Windows XP and its next versions of Windows — 2003 and Vista.
Hummingbird Exceed
Popular commercial implementation of X11 for Windows. More complete versions include a built-in SSH client.
Interactive are all tasks that require user dialogue and can not work in batch mode. All graphical applications (Mathematica, Maple, etc.) are classified as such, as well as some of the command line applications whose input and output can not be redirected.
Launching interactive tasks
Interactive tasks are started with the command qsh -l h_rt = hh: mm: ss, where hh: mm: ss is the time we expect as the maximum session duration. Other resources may be requested with the suggested resource specifiers. After submitting this command, the resource allocation system attempts to satisfy within a few seconds the desire for resources and, when successful, runs the xterm graphics terminal on one of the free processors. In case of failure, an error message is received and the interactive session is denied. This happens if there are no free processors for interactive work at present or if the requested resources exceed the available ones. For proper startup of the graphical terminal, you should have a working X server and propperly set $ DISPLAY environment variable. The latter happens automatically if you use tunneling X11 through the SSH session to the cluster. For more details, see the graphic apps page.
Parallel interactive tasks
It is possible to run multithreaded and / or multiprocessing interactive tasks. For the purpose of the qsh command. The parallel enviroment should be specified to use ithreads with the appropriate number of slots, for example:
qsh -l h_rt=1:0:0 -pe ithreads 4
This command declares four processors for a multi-threaded application (Java, OpenMP, or other mechanism). After starting the interactive session, you should indicate to the applications you are working with that they should use 4 threads. The very mechanisms by which this is done are specific to the various applications. One should find the mechanism to determine the level of competition of the applications you work with.
Cluster access
The only way to access the cluster is through the protocol SSH (Secure SHell). For this you can use one of the many available SSH clients:
- for Windows: PuTTY (recommended client) or SecureCRT
- for Unix/Linux: ssh (from the packet OpenSSH) or ssh2
The computational cluster has two front nodes to link to:
| FQDN |
RSA fingerprint of the key |
DSA fingerprint of the key |
OS |
session |
port |
physon.phys.uni-sofia.bg |
c0:1a:95:98:60:b7:e3:cd:ff:4c:86:4b:5f:84:60:bc |
2c:c9:b4:a4:a2:b1:51:4f:2c:08:3a:d2:f1:bb:15:21 |
Ubuntu 8.04 LTS |
ssh/sftp |
22 |
uspcc.phys.uni-sofia.bg |
93:e1:aa:4d:14:83:1a:82:83:05:26:6d:5f:35:c2:a6 |
49:5d:54:50:e2:04:b4:bf:3d:87:aa:b0:ee:b6:e8:6a |
Ubuntu 12.04 LTS |
ssh/sftp |
22 |
physon.phys.uni-sofia.bg |
af:a0:27:47:32:f0:3b:07:b8:d4:fe:c5:97:d9:6c:de |
6c:f7:fa:be:7b:2e:4e:44:db:d0:9d:a1:87:6b:9a:e6 |
Ubuntu 11.10 |
nxclient |
2022 |
Durring the first cluster connection SSH customers show the value of RSA fingerprint. Compare the displayed value with the one shown above – each difference indicates that a third party may interfere with the communication! The value may also be different if the server key is changed, which will be reflected in the news on the main page.
Q: When I try to connect in the cluster I get an error message that the protocol is not supported.
For security reasons, version 1 support of the SSH protocol is disabled. Some older clients only support version 1 and can not access the cluster. Update your client’s version or select version 2 of the protocol.
Question: SSH The session “dies” or interrupts after a few idle hours.
Access to the frontal node is via a rewrite system for network addresses. For security reasons, in the absence of traffic in either direction within two hours, links are automatically terminated. Please do not leave “hanging” terminals unattended!
Upload / download files
Access to the cluster file system is provided through the protocols SFTP or SCP. To do this, you can use one of the many SFTP / SCP clients:
- for Windows: WinSCP (recommended client), FileZilla or pscp
- for Unix/Linux: scp (from the packet OpenSSH or ssh2)
Access via NX client
The computational cluster allows remote access through an NX client when you want to run interactive sessions with X11 protocol support. For this purpose, you need to install NX client version 3.X, which can be downloaded from the following address:
Detailed instructions for setting up the NX session can be found in the following document